The Gear Doctor – Fall 2015

Most often, when people return from an exhausting camping trip, the last thing they want
to do is clean all of the gear they took with them. Being out in the wilderness and lacking the effective cleaning supplies we are accustomed to seeing in the cupboard underneath our kitchen sinks, often only the “quick clean” of gear is done, and it tends to be left that way once we return home. But good enough doesn’t always cut it – think of the money you spent on your equipment and what it would cost to replace if not properly cared for. Check out our advice for how to best clean your gear and with what products to ensure it lasts as long as possible, continuing to assist you on adventurous camping tripdirty_bootss for years to come.

Boots
The best way you can guarantee your boots will be kept in great shape is to make sure you take 10-20 minutes cleaning them up after each trip. First, remove the laces and insoles, if they are removable. Start with warm water and a small brush (a firm-brush toothbrush will do) that is able to reach into the cracks and crevices of the boots, and start brushing. If a small brush is just not cutting it, browse more specialized tools meant for boot cleaning. When the obvious dirt has been removed, rinse the brush and go over the boots again, but this time with warm water and a boot cleaner. If none is available, a mild dish soap will do. Stay away from laundry detergent or bar soap, as they can damage the boots through residue. Allow the boots to dry in room temperature. Many people use the quick-dry method of drying their boots next to a fire or in the hot sun, but this can cause the leather to become brittle and the adhesive parts of the boot to wear out. The best way to dry them quickly is to place them in front of a fan. If you don’t have a fan, REI suggests using newspapers that are shoved in each boot, which work to absorb excess moisture. Place boots upside down during drying, as this speeds up the process. Once the boots are dry, make sure to use a conditioner coating if they are looking cracked. Also, waterproof boots after each use. Many people want to remove the smell from their boots, so place each in a large, sealed bag and keep them in the freezer for 48 hours, which will kill the bacteria causing the stink. Store boots in a spot where the temperature remains constant, keeping them in perfect condition until your next adventure.

Cooking Supplies
Cleaning your camping cookware is a little less time consuming that caring for your footwear, but still just as important when it comes to preserving your gear. We all do the quick clean on cookware during camping trips, but spending time actually getting rid of the bacteria and grime when you get home is crucial. Fill each pot and pan with hot water and add several drops of soap – use biodegradable if you’re out on the trail doing the once-over clean. Make sure to use any kind of soap, even if it is biodegradable, at least 200 feet away from water sources. Scrub the inside of each several times using a rough sponge or pot scrubber. Rinse the pots with clean water and put them aside to dry. In the case of cooking supplies, the at-home deep clean is pretty obvious, but as for on-the-trail advice, place your cookware in separate pockets of your pack or wrap them in bags to avoid the blackened bottom of pots and pans from staining other equipment.

Tent
Making sure your tent lasts a long life starts the first time you set it up at a campsite. Ensure there are no objects below the tent such as rough plants, rocks, or roots, because this is the number one way tents are destroyed. This isn’t to say you just tear any vegetation to make room for your tent, but rather find a space that has even, clean ground that is already in existence. Making sure the bottom of your tent is also protected on the inside is another thing to think about. Consider purchasing a footprint, which is a barrier between your feet and the bottom of the tent that covers the entire surface of the floor. In addition, make sure the tent is taught when securing it with stakes to prevent any area becoming a catch basic for water or other debris. Make a habit of not wearing shoes inside the tent, and that should help to keep dirt and debris outside, but still make sure to sweep or shake it out several times when you’re done. Another alternative is to use a PahaQue Tent Rug to help keep your tent clean. Something else people don’t consider as often when setting up camp is that most tents are made of nylon, which is worn away by the sun. Try to set up the tent in a shaded area to prolong its life. When packing the tent away at home, the most imperative factor of whether or not it will last is if it’s dry or not. Set up the tent when you get back home and use a non-abrasive sponge, cold water, and a non-detergent soap to clean the inside and outside. Any cleaning products with a perfume smell will attract bugs. Once it is fully dry, pack away in a room temperature, dry location.

The Gear Doctor – September 2015

The Gear Doctor – Camping With Kidscamping4

 Camping can be the most enjoyable trip for kids, or it can be the most boring.  In this day of electronics, kids are always busy with something at home.  Rule #1: no electronics allowed on camping trips.  Getting to know nature and creating memories will stay with your child longer than playing video games.

Some fun activities include:

  1. Do It Yourself First Aid Kit: cartoon bandaids, bug towlettes, antiseptic wipes, calamine lotion, and gauze pads.  The Dollar store is a great place to get a themed zipper case and all the ingredients for the kit.  As your child puts the kit together,  teach him/her what each item is used for.
  1. Make your own bubbles:

To make your bubble mixture:

Dissolve the cornstarch in the water, stirring really well.  Then gently stir in the remaining ingredients.  Avoid creating a lot of froth.  Allow your mixture to sit for at least an hour, stirring occasionally if you see the cornstarch settling to the bottom.

To make your bubble wand:

 I used two drinking straws, and a length of yarn that was 6 to 8 times longer than the length of one straw.  Thread the yarn through the straws, tie a knot, and you’re good to go!

  1. Make papier mache:

Start with one cup water and one cup flour.  Mix together in a large flat bowl until smooth.  Tear 1” strips of newspaper and dip into mixture.  You can use plastic cups, blown up balloons, or things found in nature, such as pinecones as your base.  Place wet strips over the base and smooth out.  Continue layering strips until you have the desired thickness.  Allow to dry overnight.  Paint or decorate with leaves, twigs, and tiny pinecones, using plain white glue.  You’ll need to bring watercolors and brushes if you decide to paint it….cleanup is easy!

  1. Make your own trail mix. You’ll need ziplock bags, nuts, dried fruit, coconut, chocolate or butterscotch chips, pretzels, etc.  Let your child use a small cup to measure each ingredient and place into the bag.
  1. Look at trail maps close to the camping area. There may even be some right in the campground.  Take a hike to a fun destination such as a waterfall.  Don’t overdo or try to do too many miles in a day.  For a beginning hiker under 5, 2 miles round trip is plenty.  For an older child up to age 10, 3 or 4 miles is OK.  Have a daypack ready for your child, and have him/her fill it with trail mix, water bottle (a must!),  first aid kit and box juices.  Camera and binoculars are optional but fun.  If you see wildlife, these items will come in handy.  DO NOT approach wildlife or attempt to feed it.  Feel free to use a cell phone video setting to capture some live action.  Hiking will tire your child and they will sleep well at night!
  2. Don’t forget games: playing cards, jigsaw puzzles, yarn kits, and collecting jars for bugs and leaves.  When you get home, you can press leaves between wax paper and place between two towels.  Iron on low to melt the wax paper around the leaves, and your child has a lasting memory from the hike.  Remember to PLAY with your child on a camping trip, and you will all have an enjoyable, happy memory!

We are very pleased to have Anita Hudson Easton back on our writing staff as author of our monthly Gear Doctor.  Anita is a 30 year veteran of the Outdoor Industry and is an expert in the design, manufacturing, care and maintenance of outdoor gear!

The Gear Doctor – June 2015

The Gear Doctor

E-Z Tent Pole Repair

Have you ever been in your cozy sleeping bag, and heard that dreaded and sudden “snap”?   If it’s late at night in a windstorm, this can be a big problem if you’re not prepared.  Here are some tips for an easy way to fix broken poles on your tent.

Aluminum Repair Sleeve

Campmor.com, or any camping/outdoor store carries these in the Camping Dept.  They run about $5 or so.  The sleeve looks like a 6” tube.  It can be placed over the broken part of the tent pole like a splint, and taped into place.  This is a temporary fix, but it works well in an emergency situation.  When you arrive back home, be sure to get the pole fixed properly.  One place you can send the pole to is Tent Pole Technologies in Seattle (360-260-9527), where they will fix the pole for about $15 and ship it back to you.

 Tent Stakes

The stakes you used to guy out your lines or stake the tent make excellent “splints” for the tent pole, if you do not have a pole sleeve.  Additionally, long metal tools can substitute as a splint, such as a screwdriver or small wrench.  These can be placed along the broken edge of the pole and taped sturdily.  Wrapping string around the taped splint will reinforce the strength.

When all else fails, use a strong piece of a branch and follow the same instructions.

 Shock Cord

What happens if the shock cord inside the pole has snapped?  It’s not the end of the world….here’s an easy fix!

Find the two ends of the cord and slide them through the two pole pieces and ferrule tips.  These are the small metal pieces that cap off the tent pole.  Be sure to have equal tension on each side.  Usually, there will be tiny washers inside the ferrules that are tied to the cord end.  Untie them and use them on the new cord to keep the cord from popping through the ferrule.  If there are no washers, tie a large double knot in the end on each side.

You won’t want to place undue stress on a tent that has a splinted pole.  Try not to stake out the guy lines too tightly or the splint may break.  Remember, this is a temporary fix and the splinted pole should never be used again.  Get the pole fixed as quickly as possible.   Below are 3 suggestions for repairing your pole:

1. Contact info for Tentpole Technologies:  (360) 260-9527

2. You can try calling the manufacturer of the tent to see if they have replacement poles for sale.  This is especially great if your tent is under warranty, although many times pole damage is not covered unless the tent was completely and properly set up.

3. Local Camping Store is where you can drop off broken poles and damaged equipment, and they will ship it out to a vendor for repair.

That’s it!  You’ll become your own Gear Doctor in no time!!  Until then, stay tuned for the next issue of The Gear Doctor for more tips on fix-its, camping essentials, and fun ideas.

Happy Camping!

Anita the PahaQueen

We are very pleased to have Anita Hudson Easton back on our writing staff as author of our monthly Gear Doctor.  Anita is a 30 year veteran of the Outdoor Industry and is an expert in the design, manufacturing, care and maintenance of outdoor gear!


The Gear Doctor – May 2015

The Gear Doctor

Fabulous First Aid Kit

The most important piece of equipment for a camping trip is your First Aid Kit.  I’ve made some suggestions below for a “Fabulous First Aid Kit” that will help make your trip more enjoyable, rather than having to rush to a doctor’s office.

LIST

Band-Aids of all shapes and sizes

Gauze pads (4” x 4”) and tape

Small scissors

Tweezers

Kotex pad (absorbs large qtys of blood for bigger wounds)

Aloe gel for sunburn

“Butterfly” bandages for deep cuts

Pain relief medications (Tylenol, aspirin, Ibuprofen)

Ace bandage

Splint (can be makeshift from paint can stir sticks)

Alcohol/Hydrogen peroxide or swabs

Cotton balls

Sling (a large handkerchief will do nicely!)

Moleskin and/or Nuskin (found at drug stores) for blisters

Baking soda and calamine lotion for insect bites

It’s always best to include a First Aid Manual and familiarize yourself with some of the basic procedures.  Remember that cuts should have firm pressure put on them before bandaging, to help stop the flow of blood.  If bloodflow cannot be stopped, it’s time to get to a hospital pronto.  Place the affected area above the heart while transporting the patient.  NEVER place any creams or oils on burns.  Always use cool water and wrap with a loose gauze bandage until you can see a doctor.  Ace bandages are great for sprains;  use a painter’s stir stick and wrap against the sprain if you suspect a broken bone.  No walking on a suspected broken ankle!  Fevers can be lowered with analgesics and a cool wash cloth to the head.  Drink plenty of water when camping (not just beer!), as being outdoors can dehydrate you quickly.  Always bring water bottles on hikes.

Having a first aid kit along on your trip will allow you to “fix what’s broken” along the way, and get you back to lounging in your favorite chair.  The Gear Doctor brings wine on every camping trip as first aid for relaxation……  J

Happy Camping and enjoy the outdoors!

We are very pleased to have Anita Hudson Easton back on our writing staff as author of our monthly Gear Doctor.  Anita is a 30 year veteran of the Outdoor Industry and is an expert in the design, manufacturing, care and maintenance of outdoor gear!

The Gear Doctor – April 2015

SPRING CLEANING TIME!gear doctor B

Spring has sprung!  Time to get out the tents, sleeping bags, stoves, lanterns and sleeping pads and check them after their seasons in storage.

TENTS

Set up your tent and inspect for tears, mildew and zipper pull function.  If tent is torn, you can try stitching the tear yourself with nylon thread.  If it has a small hole, you can use “K-Tape”, readily available at the local REI store or on Amazon.  REI also has a repair service for rips and tears, but the turnaround time can be as long as 6 weeks.  Give yourself plenty of time for the repair to be finished in time for your trip.  If tent has mildew or mold, take a cup of Borax and add to a 5 gallon bucket of water.  Set up the tent and wipe it completely down with a washcloth soaked in the Borax/water solution and rinse thoroughly.  Allow to dry standing up.  Vinegar works better, but can leave a residual smell, so use what you prefer.  Check all zippers to see that they function properly.  Zipper tape can be lubed with dry graphite or Tri-Flo lube, found in bicycle shops.  Lube inside each zipper pull for easy sliding.

SLEEPING BAGS

Take out of storage bag and lay flat overnight.  Check for tears and smells.  If you notice holes or tears, you can use K-Tape to stick over either one.  If sleeping bag smells, wash in a front loader or top loader with no agitator, using a mild detergent on LOW cycle.  Tumble dry on LOW in dryer.  For synthetic bags, one cycle should be sufficient.  For down bags, you’ll want to place 3 sets of balled up socks inside the dryer with the bag, and fluff the bag after each cycle has finished.  Place back inside the dryer for further cycles until down has lofted, and bag is completely dry.

STOVES/LANTERNS

Check O-rings on gas valves, and lube with suitable grease, such as silicone.  Attach a fuel bottle and test the flame starter.  If there is a clog in the line, you may need to replace the tube or valve.  Replace mantles on lanterns and burn them according to directions, so the lantern is ready for use upon arrival at your campsite.

SLEEPING PADS

Check for leaks/holes and patch any with appropriate patches and Seam-Seal.  Allow patches to cure and dry for 24 hrs before rolling up and storing in sack.  If there is evidence of mildew, follow directions with Borax as per tent cleaning.

Starting your trip with repaired/checked gear will ensure a positive, memorable experience!  There’s nothing worse than getting to your campsite with gear that doesn’t function.  And there’s nothing better than being outdoors in a clean, dry tent and getting a good night’s sleep in a clean sleeping bag.

HAPPY CAMPING!

—the Gear Doctor

We are very pleased to have Anita Hudson Easton back on our writing staff as author of our monthly Gear Doctor.  Anita is a 30 year veteran of the Outdoor Industry and is an expert in the design, manufacturing, care and maintenance of outdoor gear!

The Gear Doctor for July 2015

How to Repair a Damaged Tent

While we offer a full warranty and repair services on our products, sometimes damage can occur while on a trip, and being prepared to make effective field repairs can save the day and prevent a good trip from turning bad.

tent-rip

Field repairs are often necessary and having a repair kit on-hand is always a smart idea.

A small tear in a tent can worsen quickly, but it’s easy to repair even on the trail. Carry mending materials with you to keep your tent secure.

Materials: repair tape, seam sealer/tent patch kits. We use and recommend McNett Gear Aid Field Repair Kits, found at http://www.gear-aid.com

Time: 10 minutes to 1 hour, depending on the damage.

Most rips, tears, and leaks occur because a tent has been pitched too rigidly; find ways to set up your tent so that it can flex in high wind conditions. Always use shock cords. Check your campsite for dangerous limbs, projecting roots, and sharp rocks that could cause damage; if you must pitch your tent on a hazardous site, pad sharp rocks and clear away debris before pitching it.

Rips and tears. To mend small tears, cover the damaged, on both sides, with adhesive tent patches. Apply a liberal amount of seam sealer around the edges of patches on both sides of the tear, smoothing the edges of the tape carefully to prevent snags and leaks. Patches come in different sizes and shapes. Try to use patches that are at least an inch larger than the rip on all sides. You can use more than one patch on each side if necessary.

Large tears must be sewn closed or patched with repair tape. There are Outdoor Sewing Kits available from Gear Aid. If the tear is in a part of the tent where extra pressure doesn’t matter, turn the top edge of the tear under about 1/4 inch and stitch the turned fabric over the outside of the bottom torn edge, using a sewing awl and strong waxed thread, forming a new seam. Plan your sewing to account for water runoff; turn the edges of the patch to create a shingle effect to shed water, not a shelf to hold it. Make your stitches short and close together; double seams are strongest. To ensure a watertight seal, apply a bead of seam sealer to the bottom edges of the overlap or patch, on the outside of the tent.

Patch holes or tears in tightly stretched areas of the tent with strips of repair tape cut at least 1 1/2 inches longer and wider than the damage; if necessary, overlap strips in a shingle pattern to cover the damage completely. Tape both sides of the damaged area, and seal all edges of the tape with seam sealer, inside and out. If the patch isn’t sturdy enough, replace it when you get home with a patch of tent fabric. But the best thing to do is, after your camping trip is over, get your tent to a proper repair shop where more permanent repairs can be done.

Grommets. Tears around grommets require the removal of the old grommet and replacement of the damaged material. This typically requires special tools and presses to accomplish, although there are temporary grommet kits available and it doesn’t hurt to have some on-hand.

Leaks. To stop a leak in the rain fly or upper surface of your tent, apply seam sealer when the fabric has dried out. Leaks in the floor are probably the result of tears. Locate and repair the tear; be certain that the ragged part of your seam is on the inside surface of your tent. Seal this seam. To protect the patch, cover it with repair tape. To prevent any further damage to a waterproof floor, use a Footprint under your tent.

The Gear Doctor for January 2015

Throwing a sleeping roll and a tent into the back of a pick-up and hitting the road without a care in the world is one of the best parts of camping. But putting a little time and energy into planning your camping trip helps ensure that your precious vacation time is not spent driving around at midnight trying to find a safe, legal spot to lay your head.

Step 1

Match the amount of time you have with the distance you want to drive. Driving always takes slightly longer than you think. If your GPS unit tells you the drive is six hours long, give yourself at least an extra hour for impromptu coffee breaks, tourism and getting lost. Don’t plan campgrounds too far away from one another or you’ll spend too much time in the car and not enough time enjoying the scenery from your campsite.

Step 2

Pick out your stay places on a map and check for facilities in the locations you desire. Pick up a state map that marks the locations of state and national campgrounds and check online for private camping facilities.

Step 3

Make reservations either online or by calling the campground. Many facilities fill up during the heavy travel season in the summer, so it pays to get your spot secured. If you are traveling with an RV or a trailer, check to make sure the campground accepts your vehicle length and is easily accessible. Some campgrounds are situated off winding, dirt roads that aren’t recommended for large vehicles or trailers.  If you plan to backcountry camp, be sure to research the area you intend to visit for trail access, firewood collection, etc.

Step 4

Get your vehicle checked out before getting on the road, including the spare tire. Make sure you have the equipment for changing a flat, as well as extra oil and water. Trips that take you down long back roads may not have cell service, so prepare a solid emergency kit in case you get stuck.  A 12-volt tire pump and a can of Fix-A-Flat can turn a major hassle into a minor inconvenience.

Step 5

Call the local ranger station or highway patrol before heading out to get any information on road closures or hazards. Traveling into the remote countryside can find travelers staring at washed-out roads or getting stuck in the snow, even in the spring. Know where you’re going and what to expect to avoid unpleasant surprises. Do not rely solely on GPS units to map your journey in unfamiliar territory, and pay attention to the weather forecast.

Step 6

Pack a cooler carefully.  The less time the lid is open, the longer your ice will last.  Easy access to beverages helps reduce the amount of time digging through the ice for a soda.  Freeze as much food as possible, such as meat and extra water – this helps maintain your ice linger as well.  Pre-plan meals and combine the ingredients into one large bag, so accessing each meal from your cooler is quick and easy.  Wrap food in double plastic bags or airtight plastic container to avoid getting wet or soggy.

Step 7

Carry a little cash. Some gas stations and stores in remote locations only deal in cash or can be prone to having their card machines out of service. Likewise, have a few checks on hand for paying campground fees in no-host camps.

Step 8

Load your vehicle safely. Do not over-pack or tie it down with equipment it’s not designed to carry. Use a proper cargo rack, or rent a vehicle that can haul your stuff safely. In that vein, know that you will often have to park your vehicle at beaches and trail heads unfortunately prone to thievery. Make sure valuables are either out of view, well locked-down or with you at all times.

Excerpts from Nikki Jardin/USAToday.com

The Gear Doctor For December 2014

Cold Weather Camping Gear Tips

There is something special about winter camping. Whether it’s the hush of a snow-covered world or the glint of sunlight reflecting off icicles, winter camping shows you things you could never see in any other season. In the winter you can see farther through the woods without leaves to block out the light, you can step onto frozen waterways, and spot winter migrant birds looking for seeds on the white-packed ground. The air often feels cleaner in winter, and cold nights make for better star viewing opportunities.
The best way to enjoy these rare experiences is to go camping! Below you’ll find a few suggestions for making your all-season camping trip more pleasurable, along with safety tips and techniques. So read on, then head out into the snows for a winter day of frolicking fun.
Before you get started, be sure to check the weather report. Dramatic winter storms can be dangerous with the threat of blizzards, ice storms, freezing rain, and avalanches. Get your trip off to a good start by planning to go when the weather is calm and, ideally, clear. If you’ll be driving to your campsite, consider putting on snow tires or carrying tire chains.
Next, turn your attention to packing your clothes. If you’ll be camping in snow, it’s important that your outer-most layer be something water and wind resistant. Waterproof jackets and pants are best because they wick moisture away (and it’s moisture that will do the most harm while winter camping, keeping you from warming up). Alternatives include waterproof windbreakers for the outer layer and snow pants or baggy wool pants for the inner layers.
Below this top layer, be sure to dress in layers of wool and synthetic fibers. As your body warms up, it gives off warmth that heats the air around the skin. If you’re wearing layers, this warm air gets trapped next to your body, keeping your skin warm. More layers create more pockets in which warm air can be trapped, so you can stay nice and toasty during your walk through the woods.
Dampness, however, is the enemy in your effort to get and stay warm in winter. Once you start to sweat, the moisture cools your body down. If you’re wearing wicking layers next to the skin, like polypropelene or wool, the moisture will be carried away from your skin and will, ideally, evaporate in the air. If your upper-most layer is too waterproof, the moisture will have trouble escaping. If that’s your situation, then be sure to travel with extra dry layers, so you can change your undershirt when it gets damp. If you’re hiking, it’s best to change your under-most layer whenever you stop for a long break.
Ground cover is also important during winter camping. Damp ground and rocks (even dry ones) can sap your heat away, so carry a piece of waterproof foam pad or other layered pad for enjoying picnics outside. Tent campers will also want to store their water bottles inside the tent, and possibly even inside someone’s sleeping bag, to keep the water from freezing completely at night.
Once you’re well-dressed, with water-proof footgear on your feet, you’re ready to tackle the wintry world. Put a wool hat on your head to preserve your heat, then head for the trail! And remember to bring lip balm, sun glasses, and sun screen (yes, even in December) with you on your all-weather adventure.

The Gear Doctor for November 2014

Hammock camping is growing in popularity due to it’s convenience. With less gear than traditional tent camping, many people are choosing hammock camping as a way to lighten up their backpacks. Another asset of hammock camping is the variety of camp site options.

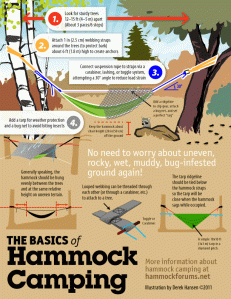
No need to find a flat, open, dry spot for your site. You just need a couple of trees and some light rigging and you’re set.  But it is not quite as simple as just hanging your hammock between two trees – in order to get the most of your hammock camping experience, you must first learn the finer points of hanging out in camp.

One to 1.5 in (2.5 to 3.8 cm) polyester or polypropylene webbing straps help disperse the weight and reduce damage to trees or other objects. PahaQue Hammocks come complete with their own adjustable hanging strap system.  Polyester and polypropylene are also low-stretch, so you won’t sag during the night (avoid nylon straps, which stretch). Pitching a hammock too tight between anchor points puts an enormous amount of force on the suspension lines and hammock, leading to potential failure (and discomfort). A tight pitch also raises the center of gravity, making the hammock unsteady. Pitching the hammock at 30° ensures you get a deep sag. A lot of beginners try to sleep in line with the hammock, curving their bodies into a banana shape. I find that this takes a lot of effort, because with a good sag, your feet naturally slide to one side or the other, finding a “pocket” of fabric. By angling your body askew of center, you fall into a ergonomically flat position (it looks a bit like a recumbent bicyclist), where the hammock takes away all the pressure points naturally. The diagonal lay is the key to comfort in a gathered-end hammock.

Here is a great quick-reference guide for properly setting up your Hammock.

Hang Guide


excerpts and images from http://survivallife.com/2014/03/07/basics-hammock-camping/

The Gear Doctor for October 2014

Your summer camping trips are over, and you’re left with nothing but photos, memories, and stinky, dirty, disorganized camp gear. You may have some fall camping plans, but at some point we all need to make a decision – wait until spring to check, clean and update our gear, or properly store it all now so that come springtime, our gear is ready to go!

Unless you possess remarkable memory skills, and can remember 5 months from now which flashlight needs new batteries, if your tent was missing some ground stakes, and your are low on salt in your mess kit, checking and storing your gear now not only ensures a longer useful life, it will also make life easier when next spring arrives.

Here are 10 useful tips for storing your gear for the fall and winter.

1. Keep a camping gear checklist handy, both for packing and putting away. Store with the gear in a clear plastic sleeve.
2. To avoid mildew, wash your tent and hang to dry completely before putting away. Check gear for wear and/or damage. Repair before putting away to prevent unpleasant surprises on the next trip.
3. Before putting away flashlights, kerosene lamps, and stoves, start a checklist of any necessary replacements, like new batteries or Sterno.
4. As you put other items or groups of items away, like first-aid kits, kitchen materials, etc., continue marking your checklist for necessary purchases.
5. Store (and transport) camping materials in clear, plastic bins, being sure to select bins that will actually fit in your vehicle. With snug, secure lids, your gear remains pest and dust free.
6. Store fuels and flammables, like Sterno, kerosene, propane, etc. away from the house, preferably in an outdoor shed. (Keep a fire extinguisher handy, just in case!) If you don’t have a separate garage or shed, consider purchasing a small safety cabinet, designed for storing flammable materials. Check your local hardware or home maintenance store.
7. Thoroughly brush hiking books of dirt and mud, and remove insoles to allow boots to dry thoroughly. Apply weatherproofing treatment before storing boots away at least once or twice a year, and install a wire shoe shelf to keep everything neatly off the floor.
8. Sleeping bags should be turned inside out and hung. Don’t store sleeping bags in small compression bags. Instead, after completely drying, fluff your bag and let it hang in a closet, or store in a large, breathable cotton bag. Backpacker.com offers great tips on how to wash a sleeping bag.
9. Cleanliness is key! Small food particles in a tent or sleeping bag can become major pest magnets or science experiments over time. Dirt and moisture can cause damaging molds and mildews.
10. Keep everything neatly tucked away on shelving