Thank You To All Our Awesome Customers!

Just wanted to let you know I received the repaired (they look new to me) poles for my 12×12 screen room yesterday,   After sell support just doesn’t get any better than this.  You folks have great products (two screen rooms and two cabanas here) that is exceeded only by your support.
Thanks,
J. Killebrew
Tarboro, NC

We had it up in a storm at a rally in Iowa and ended up with split poles which PahaQue Wilderness promptly replaced, it’s so nice to have such a great product and company.

M. Darrow

When I spend $15 to $20K on the highest quality trailer out there, I don’t mind spending $500 for a quality product to protect it, rather than some cheap tarp that lasts a couple of years. Plus, supporting PahaQue Wilderness is the right thing to do – they provide us with lots of great products.

L. Tylee

January 2017 Recipe

grilled-scalloped-potatoes1

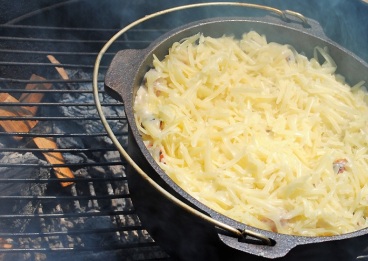
Chef Jason’s World Famous Grilled Scalloped Potatoes


Chef Jason’s World Famous Grilled Scalloped Potatoes

I love these. And they’re quite simple to make, even with the extra step of grilling the potatoes first. But that’s important here. Grilling the potatoes takes an ordinary batch of scalloped potatoes to a new level with that coveted grilled/smoked flavor we all love. And while I don’t usually use ANYTHING out of a can, making cream of mushroom soup from scratch is a bit of a long process, so taking some help from the store here is OK every once in a while in my book.

Major players:

  • 6-7 medium-sized potatoes. Russets, or Yukon Golds if you can get them
  • 8-9 green onions, chopped. Or 1 cup chopped chives
  • 1 10oz can condensed cream of mushroom soup
  • 1 ½ cups shredded cheddar cheese, plus 1 cup for topping (Feel free to use multiple cheeses. Jack, Colby, white cheddar, etc…)
  • 1 cup crumbled (cooked) bacon
  • ½ cup butter
  • 6 to 7 cloves of garlic, crushed and diced
  • Salt and pepper to taste

To start, slice the potatoes into about 1/8 inch slices. Toss them with a little olive oil and salt and grill them over medium heat for about 3 minutes per side. They don’t need to be cooked through at this point. Remove from grill and set aside.

Combine the soup, cheese, green onions/chives, garlic, bacon, and salt/pepper in a bowl. Now at this point you go can go a couple ways. What I like to do is use a disposable aluminum roasting pan. (Dutch oven is great, too.) Select the appropriate size. Spread the potatoes in an even layer on the bottom and cover with the soup mixture. Alternate layers of potatoes and soup mixture until all are used. Distribute some pads of butter over the top. Cover with remaining shredded cheese and place on the grill over medium heat for about 25 to 30 minutes. If doing this over an open fire instead of a grill with a lid, cover pan with foil. Be careful when removing the foil and watch for hot steam. Serve….

The other way is to make up individual foil packets. This batch size will be about 8 servings. Just tear 8 pieces of foil about 10 inches long and evenly distribute the grilled potatoes and soup mixture into each one. Top with butter and close to seal. Same cook time. Done.

*Note: If using an aluminum pan or foil packets do not place directly over flame.

Questions/comments/requests/suggestions/limericks/thoughts on life/childhood stories? Feel free to drop me a line at jasonr@pahaque.com.


Winter Camping Tips

Here are some handy cold-weather camping tips that can make camping more comfortable through the fall/winter camping season. Stay warm!

1. Keep hydrated during the day and avoid drinking lots of fluids at night, so you won’t have to go to the bathroom in the middle of the night.

2. Eat a big dinner with lots of calories. Calories are a unit of heat, without them the furnace won’t burn hot.

3. Keep a snack with you for the middle of the night, so if you do wake up cold you can replenish lost calories and warm back up again.

4. Go to bed warm. Warm up by taking a brief hike around camp or doing some jumping jacks. If you wrap a frozen salmon in a sleeping bag, will it stay frozen? Yes, because your sleeping bag will insulate cold or heat, just like a Thermos.

4. Select a protected campsite out of the wind and off the valley floor and other low areas where cold air settles. A good rule is to be about 50 feet above the valley floor.

6. Fluff up your sleeping bag with vigor to gain maximum loft before you climb in.

7. Use a good insulating pad between you and the ground. Studies show that what you have under you is more important in keeping you warm than what is on top of you.

8. Wear a stocking hat to bed, you lose most of your body heat through your head.

9. Keep your nose and mouth outside your sleeping bag. Your breath contains a great deal of moisture that can cause dampness to collect in the bag as you sleep. To keep your face warm, wear a balaclava or wrap a scarf around your face.

10. Roll the moisture out of your bag each morning when you get up (roll from foot to head), then leave it open until it cools to air temperature. If weather permits, set it out to dry.

11. Use a layered sleeping system (i.e. sleeping bag, liner, half bag, bivy sack). A layered system helps to remove the frost buildup that naturally occurs when your body warmth meets the cold air (a concern if you’re staying out multiple nights).

12. Avoid overheating at night and make sure you go to bed dry. Being too warm produces perspiration, so vent your bag if needed or take off your stocking hat.

13. Make sure your feet are as dry as possible before going to bed. This can be done by having a pair of dry sleeping socks in your bag for sleeping only. Also, you can “dry” wash your feet with a good foot powder that contains aluminum chlorohydrate, which helps dry the skin and reduce perspiration.

14. Wear loose fitting clothing to bed so it doesn’t restrict circulation.

15. Keep your sleeping gear clean. Dirt clogs air spaces in the material and reduces insulation value making it harder to stay warm.

16. If you have cold feet, sleep with your feet together in an elephant foot or half bag. It’s a bag that uses the principle of the buddy system, where the feet share heat instead of being isolated, much like mittens are warmer than gloves. The bag slips over your feet and legs and then drawstrings pull it shut or you could just use a fleece jacket wrapped around the same area.

17. Fill a water bottle with hot water before you go to bed and then strategically place it at any cold spots in your sleeping bag. Just make sure it has a screw on lid like the Nalgene bottles. A variation of this is to use disposable heater packs or hand warmers, which costs a little extra money. Or, in the old days they would take some heated rocks from around the campfire and place them in a wool sock. Just make sure they’re not too hot. (Editor’s note: If using this old-fashioned method to keep warm, make sure that the rocks are completely dry before heating. Trapped steam may cause so much outward pressure that the rocks may explode.)
All Good Things Must Come To An End

After many, many years of faithful service, my beloved PahaQue screen room has bit the screenroomdust.  Kicked the bucket.  It was destroyed by Hurricane Matthew back in October.

I wanted y’all to know what a great tent that was.  It went on many a car camping trip.  One in particular, it rained for a whole week and if it weren’t for that screen room, I wouldn’t have been able to come out of my tent to cook food.

It used to go with me to the race track when we did track days (riding our motorcycles on the race track).  In the winter months I’d crank up a heater in there and everyone would hang out in it keeping warm.

When the hurricane came through, it served as my shed on my new retirement property.  I’ve been building fence and clearing land so it kept my tools and mowers protected from the weather.  I would not have left it out in a hurricane but I was across the country on vacation when it came through.  I had no way of getting it out of harms way.

Well, all good things must come to an end.  RIP my PahaQue screen room.  You will not be forgotten.

C. Irvin

St. Augustine, FL

Cooky Jason’s World Famous Pouched Salmon

Cooky Jason’s World Famous Pouched Salmon

Alrighty, campers. I know a lot of the country is still gridlocked in a winter wonderland and most of you won’t be camping anytime soon. So with that in mind I try to FB_IMG_1451784156186write recipes that are just as easily done at home as at the campsite. Pouching is a very efficient way of cooking over a campfire or on a grill. And with fish it’s great because sticking isn’t a problem. You can very well do these in the oven. In my opinion, salmon needs very little help in the flavor department. However, in pouching you’re essentially steaming the food and not getting that charbroiled flavor from open fire. But that’s ok because steaming is much healthier than charring food anyway. And the key to countering that, especially with fish, is a combination of herbs. Follow along…

Major players:

  • 1 6oz salmon fillet per person (these will be individual servings per pouch)
  • ½ cup of 2 to 3 different chopped herbs. (Thyme, sage, tarragon, dill, marjoram, parsley, etc…)
  • 1 Tbsp chopped garlic
  • 1 Tbsp butter
  • 1 Tbsp olive oil
  • ½ tsp salt
  • ½ tsp ground pepper (I prefer white pepper here.)
  • Zest of half a lemon
  • 1 tsp lemon juice (This is about half a lemon, so you can do two per lemon.)
  • 1 foot x 1 foot square of heavy duty foil

OK, now for the fun stuff. Put the olive oil down on the foil first. (Put oil on the foil) Then sprinkle a little salt on the oil and also about half of the chopped herbs. Then place the salmon, skin side down, on top of your bed of oil and herbs. Next, place the pad of butter directly on top of the fillet and top with the remaining salt, pepper, herbs, garlic, and lemon zest. The grill heat should be medium…ish. Try to keep it to around 325 to 350 degrees. The salmon will be done in about 30 minutes or so. When you get close, you can peel one back and check by cutting one fillet open. And lastly, drizzle the lemon juice over the finished product and serve. If you’re plating, also pour all the deliciousness from the pouch over the salmon and other veggies or pasta. (See below)

I don’t like handling raw meat at the campsite. So what you can do is prepare the pouches at home and just keep them on ice until you’re ready for them. Let them sit out, out of the ice or refrigeration, for about 20 minutes before cooking to take the edge off the chill.

Also, you can throw in broccoli or asparagus right in with the salmon. You can even steam pasta the same way. Take fettuccine or linguine and break it in half so the uncooked noodles are about the length of the salmon. Just place the pasta on top of the salmon and close it up. The pasta will steam and cook just fine. A whole meal all in one pouch. Enjoy!

Questions/comments/requests/suggestions/limericks/thoughts on life/childhood stories? Feel free to drop me a line at jasonr@pahaque.com.

Tear Drops in Desert Sand

Teardrop Rendezvous in Quartzsite


Remote Camp Site

Little Guy Trailers and Paha Que Wilderness have just completed an epic backcountry tour of the Gold Mining areas in the old Fort Tyson area.

Participants traveled from San Diego (main group), Poway, Torrance, Fresno, Las Vegas, Phoenix, Utah and Michigan via Miami (some people use these Teardrops for long term). The tow vehicles varied from radical Off-Road Jeeps to simple family cars… all easily accessing the main camp site in the Plomosa foothills.

It’s amazing how a couple hundred yards off the pavement places you in the same terrain where Wyatt Earp lived!

Teardrop Round-up


Both novice and experts were mixed together in comfort as our guide and counselor Jeff Basford of Paha Que Wilderness organized and led a treat in the ultra-dry wilderness. We were surrounded by lava rock formations, gas vents, dozens of cacti, gravel like surfaces of dark volcanic pebbles and rugged volcanic flows.

The history of this area is rich and steeped in the Old West. From the mid 1800’s, hundreds of mines were claimed and worked by individuals and consortiums with rudimentary methods being employed next door to highly-engineered systems. Of the more fascinating accounts was the influx of the French prospectors. The cabins they built can still be seen and visited (rock structures with double wall base). These miners utilized the placer mining techniques and their tailings can be easily identified. Typically, there was a dump area within several feet consisting of old meat cans, soup and food tins intertwined with wagon and equipment skeletons.

Blooming Desert

The desert is lovely this time of year. Many cactus are blooming and the bees are busy. Although in my mind I expected absolute dryness, it was off set by the numerous Palo Verde trees with it’s vivid light-green bark. The Ocotillo cactus featured wonderful red blossoms plus the royal color of Barrel and Prickly Pear cactus flowers. Apparently, this year with the increased rains, we caught the bloom even at the end of March.

This particular trip was unseasonably warm …. around 105 degrees during the day and 90’s at night. We were very glad for the powered roof vent in our Little Guy Rough Rider model… when an inversion occurred in the middle of the night rendering our exhaust mode useless, I simply reversed the fan direction and wah-lah, we enjoyed a comfortable desert night on our queen-size bed.

Desert Shade

What a great way to camp with these Teardrop Trailers. They have just enough storage capacity to make the campsite perfect for a fresh-air outing with amenities. We noticed the various methods employed by our neighbors and it really boils down to personal needs and choices. We saw barbeques next to Dutch Ovens and discussions of utilizing Sun Ovens with the unlimited power supply of the sun. We witnessed solar power panels recharging battery systems and practical Teardrop designed side rooms attached to off-set the heat and provide a lee-side breezeway (built by Paha Que our organizer). A couple Teardrops even employed Air Conditioners with a small generator purring nearby and solar shower cabanas (no need for towels in the super dry air).

Evening Meals

This event will hopefully launch into an annual outing with the possibility of a second event into the backcountry with 4×4 vehicles only (and high clearance campers). I anticipate quite a number of participants joining us as there was plenty of area for many more campers.

If you have a Teardrop or Aliner and want to join in, please send your email address to us and we’ll include you in subsequent notices of our campouts. So far, we still want to catch Death Valley in the late fall or early spring, a mountain region lake in Arizona waiting for us on an Indian Reservation and a winery near Julian which would be perfect on a moonless night.

Our sincere thanks go to Jeff Basford and Mike Greaves of Paha Que Wilderness Camping Systems, our organizer, for designing a worthy trip with great historical and geographical account of the area. We also want to thank our participants for becoming good friends in a matter of a few days! There’s nothing like camping buddies.

French miner cabin site

Most of all we want to thank Camping Life Magazine for joining us with the trip. We should see a great article by fall with the possibility of a cover theme on Teardropping in the remote desert. We highly recommend subscribing to this publication as they endeavor to cover the type of camping near and dear to us all.

See you next trip!

Eric Krag, Regional Sales For Little Guy Trailers

Cooky Jasons Fall Recipe

Chef Jason’s World Famous Sage Roasted Pork

OK, time for the first fall recipe of the year! It’s fall time now, my favorite season, and being a seasoned foodie it’s definitely my favorite time of the year for cooking AND camping. It’s time for pumpkin-spice EVERYTHING. But the warming euphoria of the aroma of cinnamon, sage, pine, and other holiday staples is what really drives the fall season mood in my opinion, and we’re going to use a couple of those here.

Boneless country style pork ribs are my personal favorite. It’s super tender and easy to grill. But any cut of pork will work just great. If you’re using pork chops, make sure they’re at least an inch thick. And this will be a double cooking process. Follow along…

Major Players:

  • 3-4lbs preferred cut of pork. Boneless is best
  • 4-5 cloves garlic, crushed and finely minced/diced
  • ½ cup chopped onion
  • ½ cup finely shredded/chiffonade sage. Must be fresh sage; no dried stuff from plastic jars here.
  • 1 cup dried cranberries, or 1 ½ cups fresh ones (roughly chopped)
  • Salt and pepper
  • Olive oil
  • 1 Tbsp butter
  • ½ cup chopped walnuts

Start by grilling the pork just until all sides are browned and you have some nice grill marks on all sides. Make sure you coat the pork in a little olive oil and salt and pepper first. You don’t need to cook it all the way through here. The second part of this is done in foil pouches. Pour a little olive oil on the foil and lay the pork down on top. Then simply add the garlic, onion, sage, cranberries, butter, and chopped walnuts over the pork. Seal it up but leave a slight opening for venting. Let that hang out over medium heat for 25 to 30 minutes. Remove the pork from the foil to a plate to cool, but don’t you dare throw all that wonderfulness in the foil away. No no no… Drizzle the contents over the pork and serve. Sagey goodness abounds. Happy Fall!


Questions/comments/requests/suggestions/limericks/thoughts on life/childhood stories? Feel free to drop me a line at jasonr@pahaque.com.

Celestial Navigator – November 2015

November is always a great time of year for stargazing.  Cool nights and crisp clear air provide spectacular views on cloudless nights.  As always, stargazing is best away from cities and populated areas, and is a great nighttime activity in camp!111104-Meteor1Photo-hmed-0355p.grid-6x2

  • November 5, 6Taurids Meteor Shower. The Taurids is a long-running minor meteor shower producing only about 5-10 meteors per hour. It is unusual in that it consists of two separate streams. The first is produced by dust grains left behind by Asteroid 2004 TG10. The second stream is produced by debris left behind by Comet 2P Encke. The shower runs annually from September 7 to December 10. It peaks this year on the the night of November 5. The second quarter moon will block out all but the brightest meteors this year. If you are patient, you may still be able to catch a few good ones. Best viewing will be just after midnight from a dark location far away from city lights. Meteors will radiate from the constellation Taurus, but can appear anywhere in the sky.
  • November 11New Moon. The Moon will located on the same side of the Earth as the Sun and will not be visible in the night sky. This phase occurs at 17:47 UTC. This is the best time of the month to observe faint objects such as galaxies and star clusters because there is no moonlight to interfere.
  • November 17, 18Leonids Meteor Shower. The Leonids is an average shower, producing an up to 15 meteors per hour at its peak. This shower is unique in that it has a cyclonic peak about every 33 years where hundreds of meteors per hour can be seen. That last of these occurred in 2001. The Leonids is produced by dust grains left behind by comet Tempel-Tuttle, which was discovered in 1865. The shower runs annually from November 6-30. It peaks this year on the night of the 17th and morning of the 18th. The first quarter moon will set shortly after midnight leaving fairly dark skies for what could be a good show. Best viewing will be from a dark location after midnight. Meteors will radiate from the constellation Leo, but can appear anywhere in the sky.
  • November 25Full Moon. The Moon will be located on the opposite side of the Earth as the Sun and its face will be will be fully illuminated. This phase occurs at 22:44 UTC. This full moon was known by early Native American tribes as the Full Beaver Moon because this was the time of year to set the beaver traps before the swamps and rivers froze. It has also been known as the Frosty Moon and the Hunter’s Moon.

Cooky Jason’s September Recipe – Lamb Burgers

010115_mediterranean-lamb-burger-recipe_largeWell the end of summer draws nigh. But that’s OK. Soon we’ll all be drinking/eating pumpkin-spice EVERYthing. And football is gearing up which brings its own genre of cookout favorites (as long as weather permits, of course) as mainstays such as hearty chili and beef stews have the dust brushed off their recipe pages. Until then, however, it’s time for one last summer hurrah…

You can’t go wrong with burgers at the campsite, right? The combination of beef and lamb here along with the magical basil sauce make these a bit unique, yet still easy to make, and guaranteed crowd-pleasers. Serve with watermelon wedges and a nice summer ale or fresh lemon-limeade and enjoy the last 3 weeks of summer while you can!

Major players

  • 1lb ground beef (80/20)
  • 1lb ground lamb
  • 1 Tbsp olive oil
  • 1 tsp each of salt and pepper

Magical Basil Sauce

  • 1 cup chopped basil
  • 2 green onions, chopped
  • 3 cloves garlic, chopped
  • 1 tsp Worcestershire sauce
  • 1/3 cup sour cream
  • ½ cup mayonnaise
  • ¼ tsp fresh ground pepper
  • Juice and zest from 1 large lemon

For the burgers:

OK, let’s do this. Using 2 different meats really adds a lot of depth profile in the flavor. If you can’t get ground lamb just use ground pork. Using your hands, thoroughly combine the beef and lamb in a large mixing bowl, then add the olive oil and salt and pepper and combine. You’ll get 6 to 7 burgers out of this, depending on how big you make them. Start by forming a giant meatball. Then slowly compress your hands while rolling it between your palms until a patty is formed. Then use your thumb to press an indent into the middle. If you’re taking these to the campsite, wrap them individually in plastic wrap or wax paper and keep chilled until ready. You can also freeze them if it makes them easier to transport for you.

Cook on grill over medium-high heat about 3 ½ minutes per side. About a minute before removing from grill, add a slice of your chosen cheese. Mozzarella loves basil…

Serve on toasted sesame seed or ciabatta buns. Using good bread here really makes a hug difference, so it’s worth it to choose a higher quality bun to go with all the love that just went into the burgers themselves, don’t you think?

Magical Basil Sauce:

Blend all ingredients until smooth, about 2 to 3 minutes. Taste and adjust by adding salt and pepper if needed. You can do this several days ahead of time if you like. Just make sure it’s plenty chilled while transporting. Spoon over burgers and finish off with lettuce, tomatoes, onions, etc… Or leave them veggie-less and let the lamb really be the star. Perfection.

This is our last newsletter recipe of the summer and we’ve had a truly fantastic summer and I hope all of you did, too! Feel free to share/email me pictures of our recipes when you try them.

Questions/comments/requests/suggestions/limericks/thoughts on life/childhood stories? Feel free to drop me a line at jasonr@pahaque.com.